VPC Setup for Solutions Architects
Solutions Architect Series - Practical Exercises for Passing the AWS Solutions Architect Exam.

The best way to prepare to pass any AWS exam is to actually use AWS services. I have seen people complain that some so-called certified AWS Solutions Architects can't even spin up an EC2 instance. Don't be one of those solutions architects! True, some people probably can pass the exam only by reading and memorizing the docs, there is no better thing than actual experience.
Documentation + Experience = Passing the Exam
The important thing to keep in mind for the exam it that it is not only important to know how to do something, but also to understand why. Many questions, especially on the professional exam, will offer several seemingly correct answers, but ask you to select the best choice. For these questions, understanding the why will make the difference between passing and failing the exam.
VPC Basics
When setting up a new network or cloud presence for a client, likely the first thing you will do is configure their Virtual Private Cloud (VPC). Client needs are all different and unique, but there are some common use cases that can be tailored to a specific situation. VPCs define your virtual network topology (IP addresses, subnets, internet gateways, access control lists, etc.) and provide a way for users (both internal and external) to access your cloud resources. VPCs define how your cloud connects to the open internet or to your on-premises (on-prem) data center, or both.
A few things you must know about the AWS Architecture:
- VPCs are contained within one AWS region
- VPCs can span multiple availability zones (AZs)
- VPCs can contain multiple subnets
- Subnets are contained within one AZ
- Subnets can be public or private
The following diagram represents what we will build in the exercise.
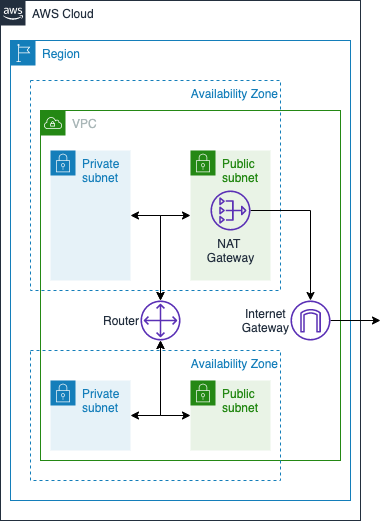
- Internet Gateway - exists within the AWS VPC and gives your resources access to the internet
- Router - exists within your VPC and routes traffic between your subnets
- NAT Gateway - (optionally) exists in your public subnets and translates traffic for your private IP addresses to the NAT instance's public IP address (more on this later)
Virtual Network Design Considerations
Security and availability should be the primary drivers behind your network design:
- Security - Expose as little as possible to the open internet (e.g. only put the absolute minimum in public subnets)
- Availability - Spread services across AZs or regions
For more on VPC design, see AWS Single VPC Design. Okay. Enough talk. Let's build something.
Exercise
There are many ways to set up the VPC. In this exercise, we will create a basic VPC with public and private subnets, multiple AZs, and an internet gateway. More advanced topics include connecting your on-prem data center to the VPC, multi-VPC setup, IPv6, and others. These will be covered in other posts.
Disclaimer: Using AWS resources may incur costs. Most of the exercises described in my posts can be done within the free tier, however, some cannot. If you do the exercise relatively quickly (i.e. don't leave things running overnight), and de-provision resources when you are done, the charges you accrue will be minimal.
Pre-requisites:
- You have an AWS account. If you need one, create a new AWS account here.
The major steps in the process are as follows:
- Create the VPC
- Create public and private subnets
- Secure network resources
1. Create the VPC
When creating the VPC, the first thing to consider is the private IP space. We need to make sure that we are not overlapping any other IP space covered by other peer VPCs or on-prem networks and subnets. We do this by specifying our Classless Inter-Domain Routing (CIDR) block. All of the subnets we create in our VPC will also specify CIDR blocks. The subnet CIDR blocks will need to fit within the larger VPC CIDR block that we are about to create.
How CIDR Works
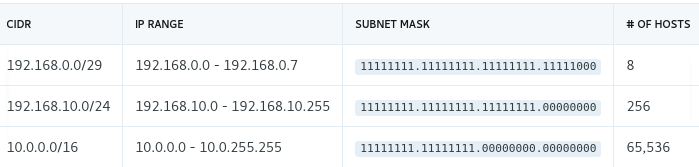
CIDR is a way to specify a range of IP addresses. CIDR notation looks something like 10.0.0.0/16 or 192.168.0.0/24. The first part (before the /) is the starting IP address. The number after the / is the number of leading 1 bits in the subnet mask (1 bits represent the common part of the IP addresses that can be used by hosts on your network in that CIDR block).
Here is a handy CIDR Calculator to help.
All private IP addresses fall in the following ranges: - 192.168.0.0/16 - 172.16.0.0/12 - 10.0.0.0/8
For this exercise, let's create a VPC with 10.0.0.0/16, giving us 65,536 maximum hosts in our network. Later on in step 2, we will create subnets that use a subset of this IP space.
Using the AWS console:
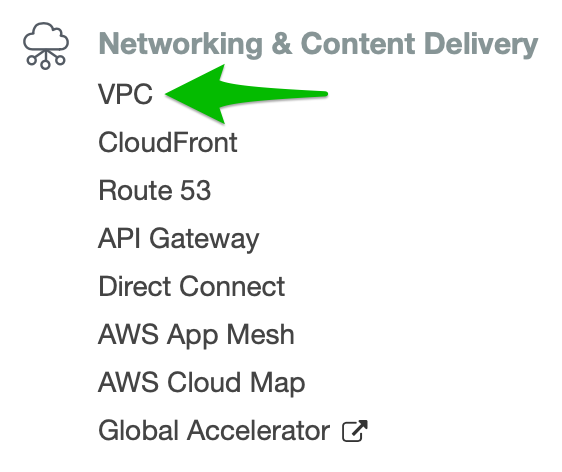
- Open the VPC management console
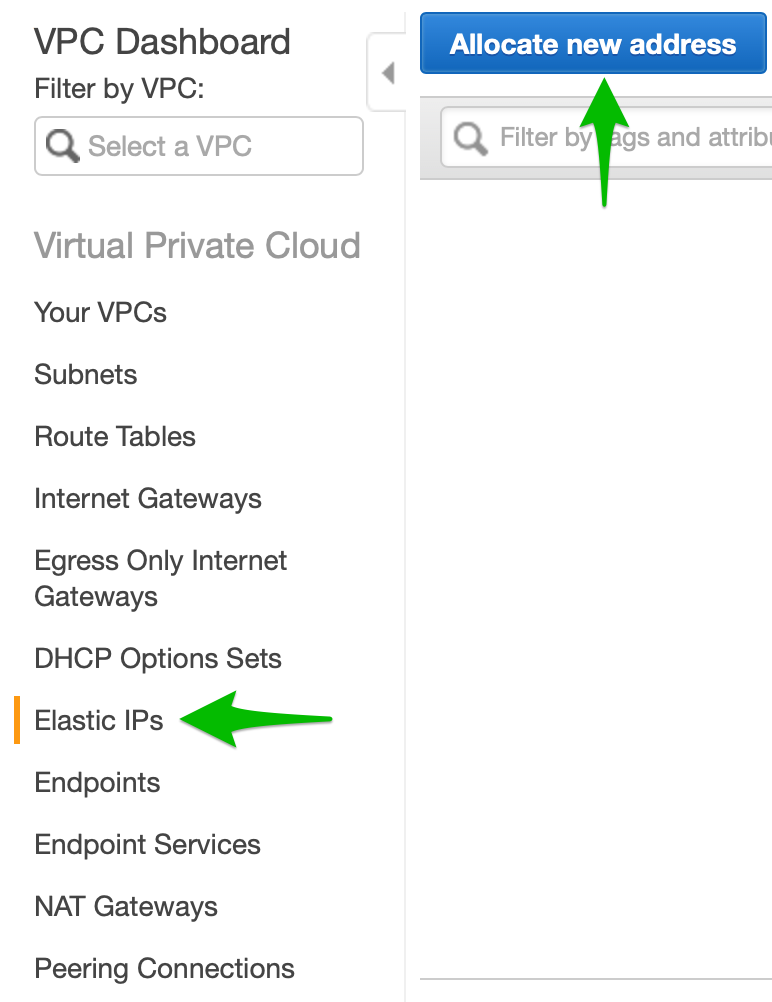
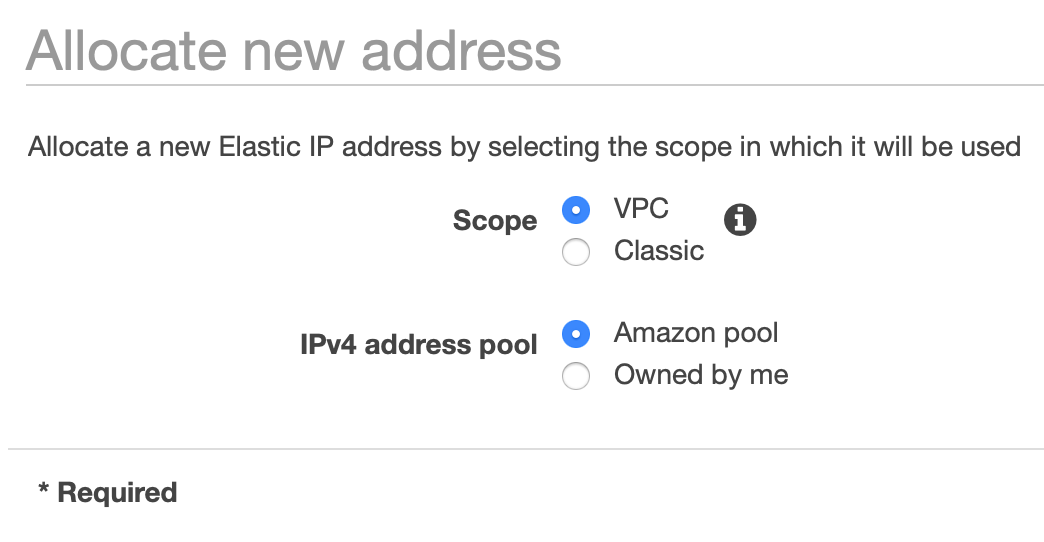
- Provision an elastic IP address. This is the public IP address that we will use for our NAT in a moment.
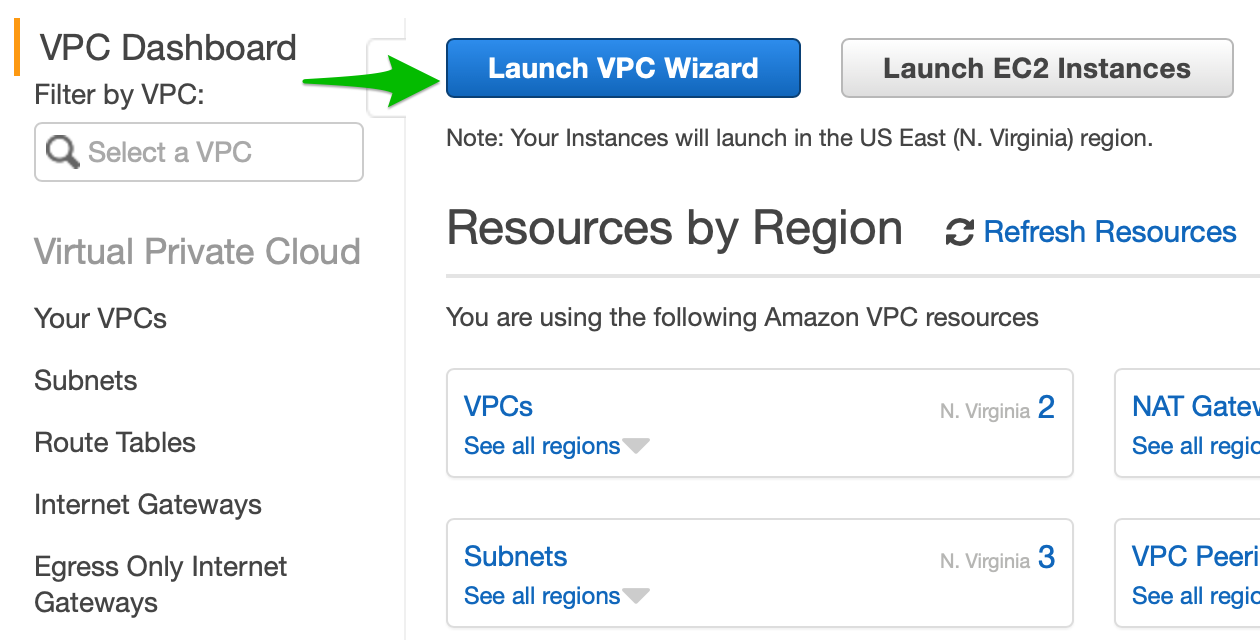
- Once the elastic IP address has been created, go back to the VPC Dashboard and click Launch VPC Wizard
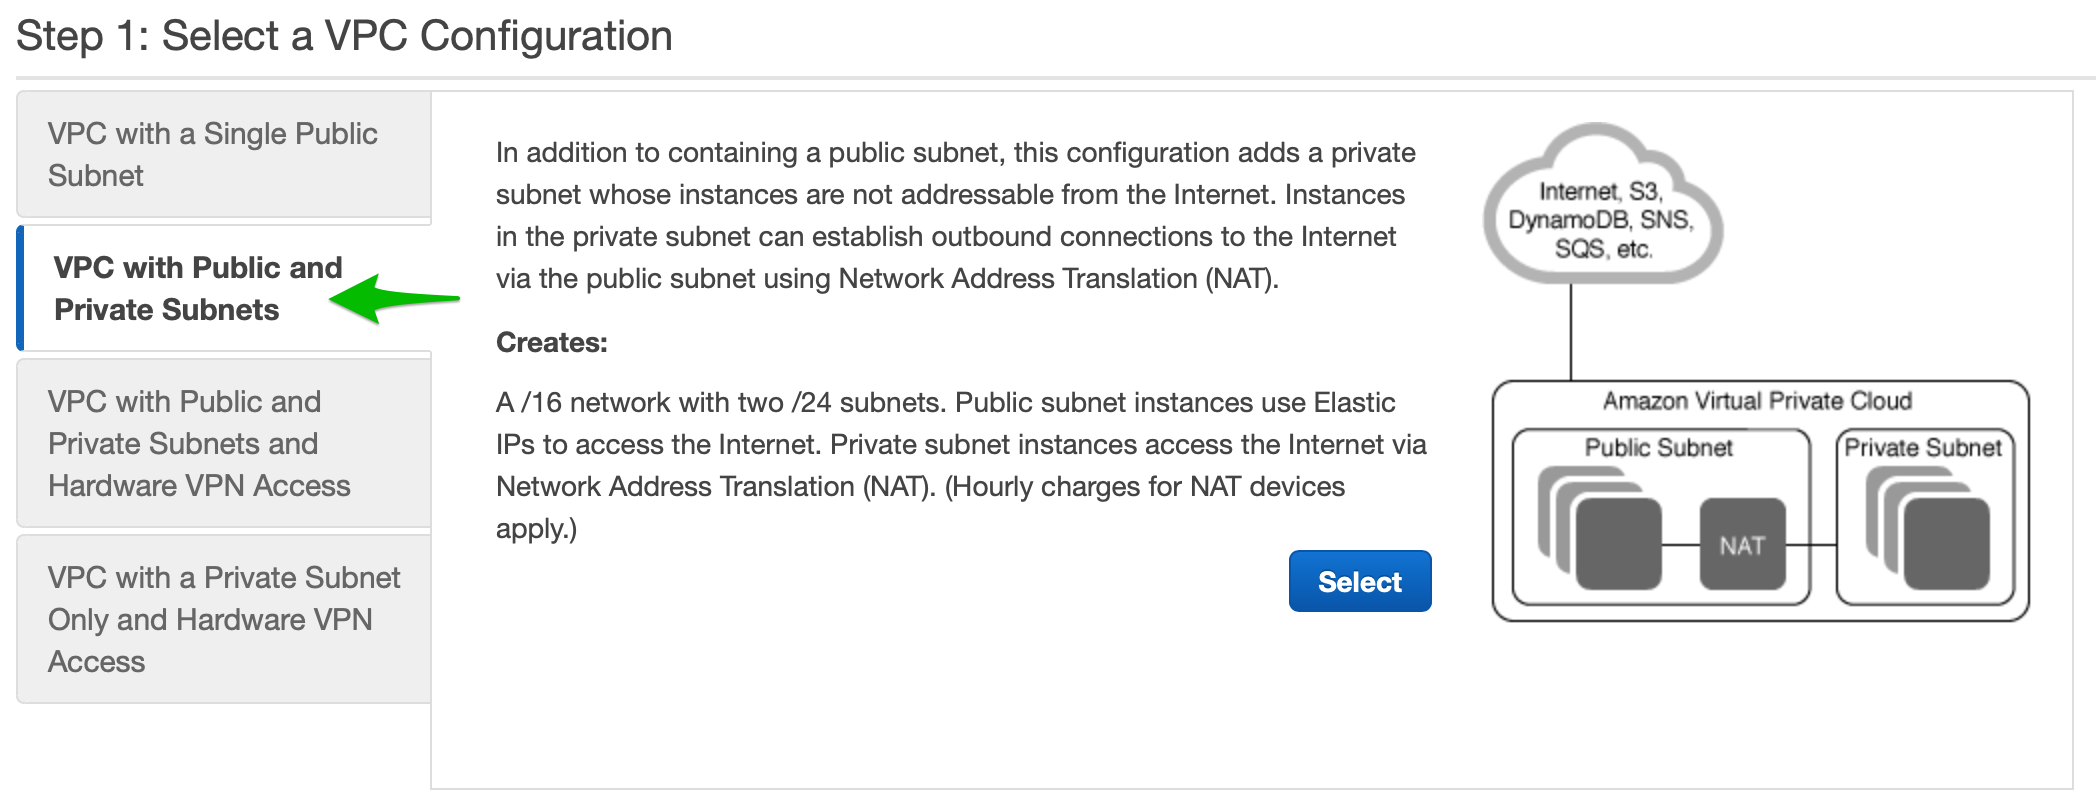
- Select VPC with Public and Private Subnets
- Fill in the details

- The IPv4 CIDR block should be filled in for you with 10.0.0.0/16. Select No IPv6 CIDR Block as IPv6 will be covered in a separate post. Give your VPC a name.
- Why does it say 65,531 IP addresses available, not 65,536 as stated above? This is because AWS reserves the first four (4) IP addresses and the last one (1) IP address of every subnet for IP networking purposes.
This will set up our VPC. The next section in the wizard lets us set up our subnets.
2. Create Public & Private Subnets
Now we can configure the first 2 subnets in our VPC.
- Fill in details about the public and private subnets and give them names.
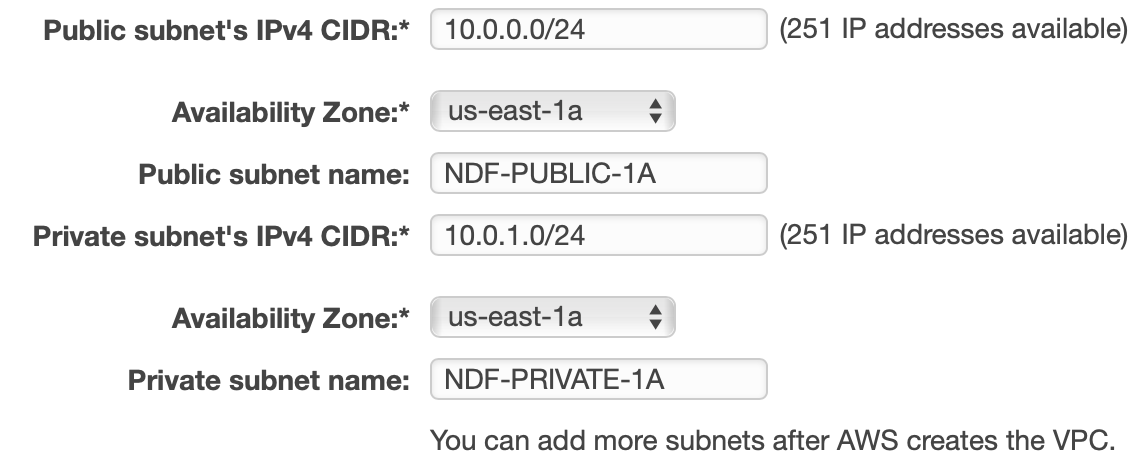
- Notice that default CIDR blocks create a 256 address subnet each - 10.0.0.0 for the public subnet, and 10.0.1.0 for the private subnet.
- Set the availability zones to the same thing. In my case, I set it to us-east-1a since I created the VPC in the us-east-1 (N. Virginia) region. If you are using a different region, choose any available AZ. We want to set this to a specific AZ (don't choose No Preference) because we are going to add more subnets in other AZs later to provide high availability.
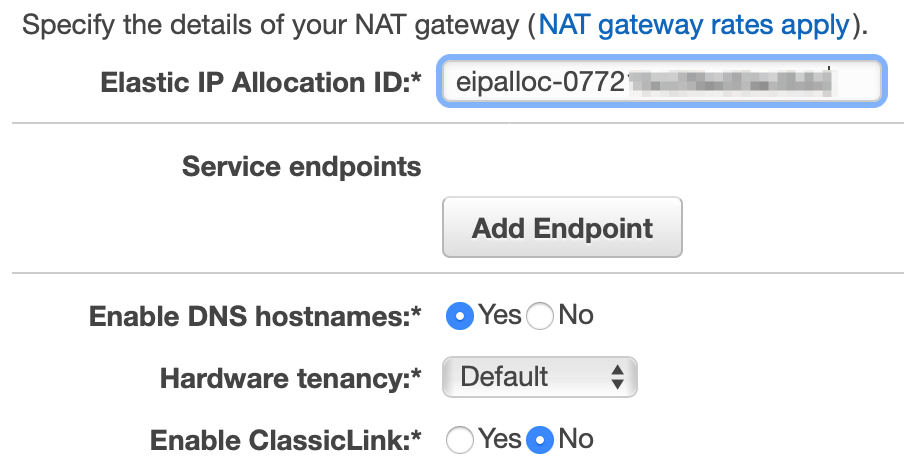
- Set up the NAT by selecting the elastic IP we created before. Leave the other defaulted settings and click Create VPC.
- We now have a VPC with 2 subnets, one public and one private. If you open the subnets section you can see the subsets you have created. Notice that the public subnet has one less IP available than the private subnet; this IP address is used by the NAT instance.

High Availability
The next step is to create 2 more subnets in a different AZ. This allows our applications to support high availability. If this were a real deployment, we could provision EC2 instances running redundant versions of the application(s) such that if one AZ were to fail, the other would continue serving traffic.
-
On the Subnets section of the VPC Dashboard, click Create Subnet. Fill in the details to create a new public subnet, this time in AZ us-east-1b.
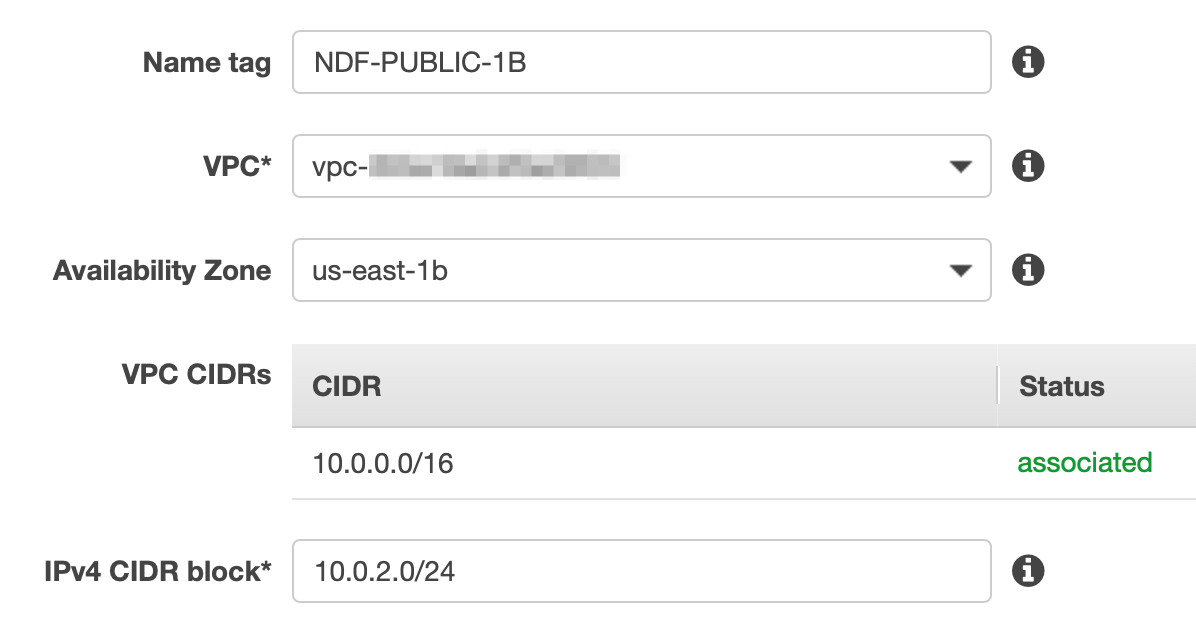
-
Do the same for the next private subnet and make sure the CIDR matches the screenshot below.

NAT Gateways exist within a single AZ but can route traffic to subnets and instances in all AZs within your VPC. As a solution architect you must decide whether to add another NAT Gateway in the second AZ. If you are running one NAT Gateway and the AZ it resides in goes down, all private instances within the VPC will be affected. If you create a second NAT Gateway in the new AZ, either AZ could fail and your system will still function, but this comes at increased cost.
For this exercise, we will keep only the one NAT Gateway we created using the VPC wizard.
3. Securing Your Resources
Now let's talk about security. When we used the VPC wizard to create the VPC, it automatically created some components for us that help secure our network.
- Route Tables are associated with one or more subnets and define what routes are available in your network (e.g. sending traffic to the internet gateway)
- Network Access Control Lists (ACLs) control traffic in and out of subnets.
- Security Groups control traffic in and out of instances.
Route Tables
The VPC wizard created two route tables for us. One is for the subnets within our VPC to be able to talk to each other as well as the NAT Gateway. This route table is also called the Main Route and will be automatically associated with new subnets added to your VPC. The other route table allows access to the internet through the internet gateway. This one is explicitly associated to the initial public subnet we created.
What's the difference between a NAT Gateway and an internet gateway? They seem to do the same thing. This does appear to be the case on the surface, but there are some key differences.
- NAT Gateways exist within a public subnet in a specific AZ; An internet gateway spans the entire VPC and is horizontally scaled, redundant, and highly available.
- NAT Gateways incur cost; internet gateways do not
- NAT Gateways are used to allow internal instances in private subnets access to the internet; Internet Gateways allow access to the internet from the VPC as a whole. If a subnet has direct access to the internet gateway, it is by definition, a public subnet. (This is definitely a more complicated topic and there is more to it which I cover in a different post.)
- Check the route table configuration by selecting Route Tables in the menu on the left.

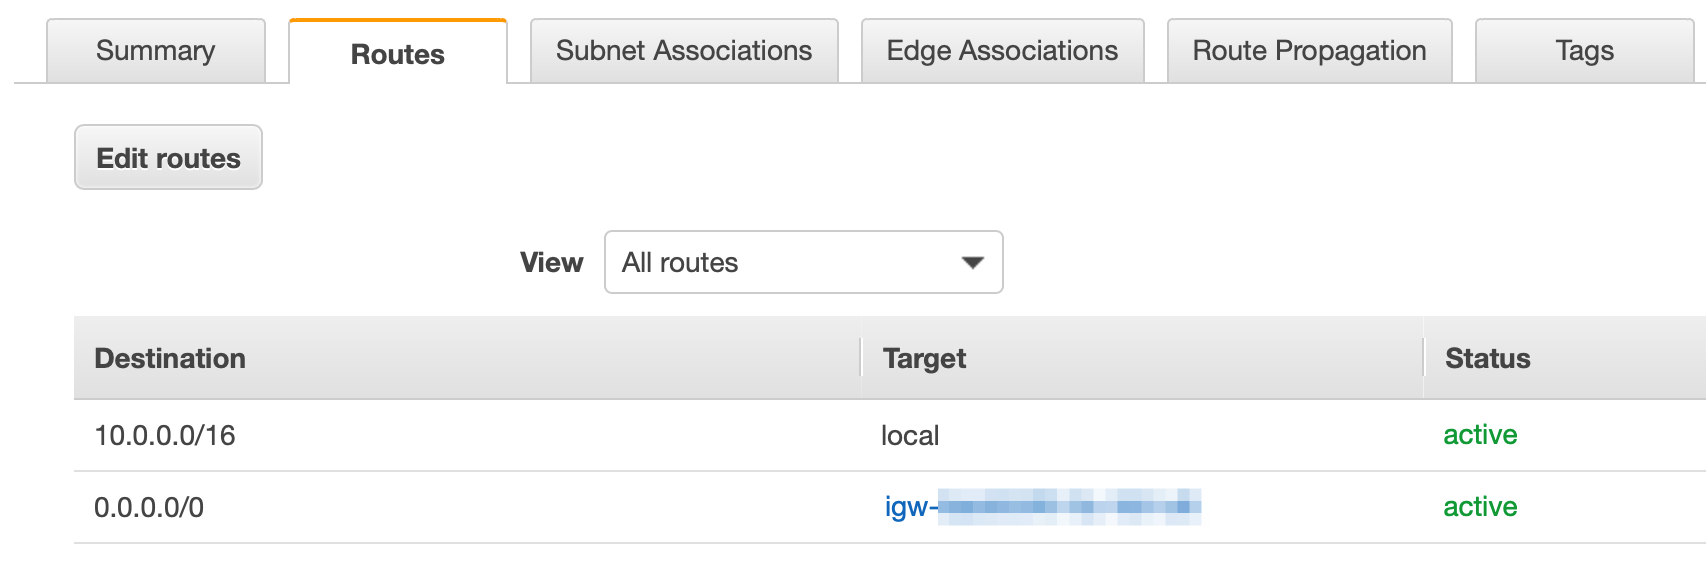
You should see two route tables defined. One is mapped to a specific subnet, and the other is identified as the main route. If you click on the one with the specific subnet, then click the Routes tab, you will see that this route allows access to the internet. There are actually 2 routes defined. One allows the subnets within you're VPC to talk to each other (10.0.0.0/16 to local) and the other allows access from any subnet / any IP in your network access to the internet (0.0.0.0/0 to igw-). Since this route table is only associated with one subnet, that subnet is the only one that can reach the internet.
- Now click on the Subnet Associations tab. You will see the one subnet associated with this route. You will also see the other 3 subnets in our VPC associated with the Main Route.
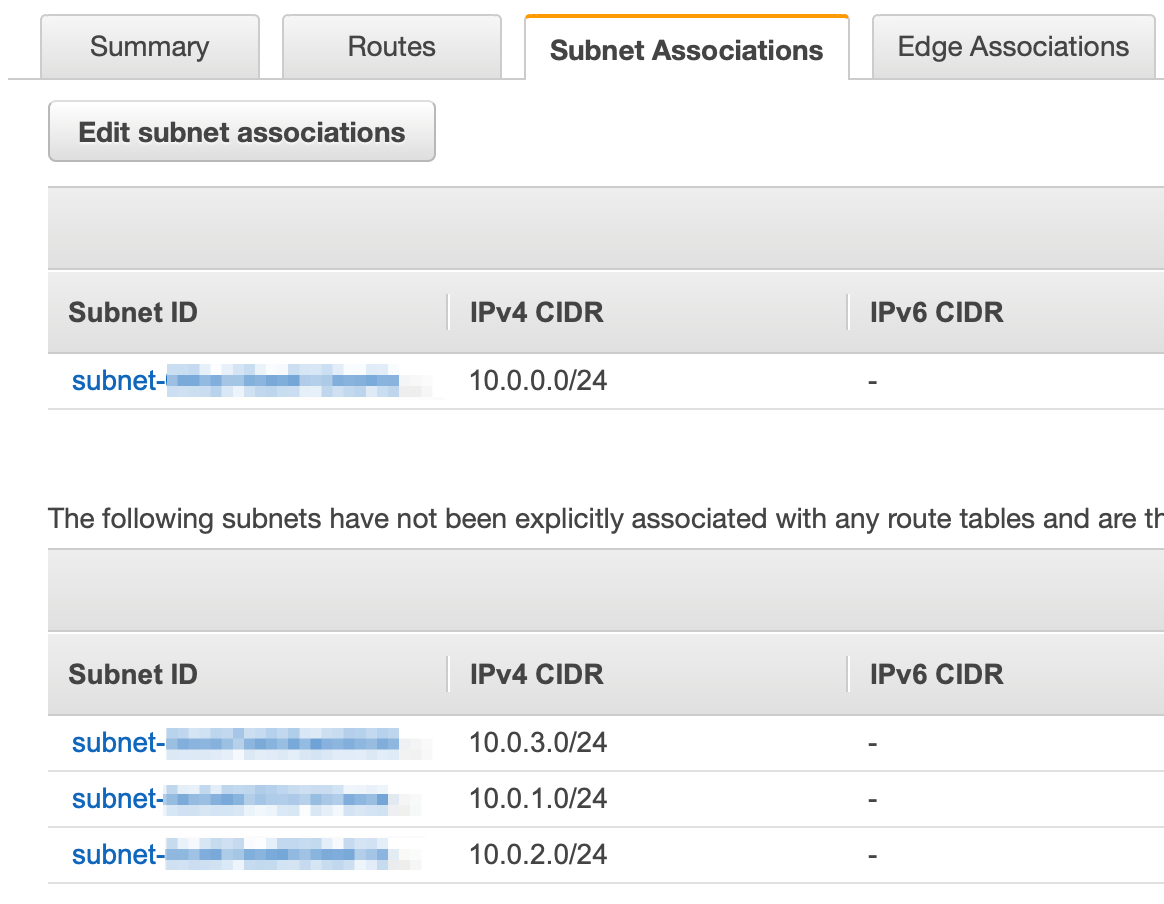
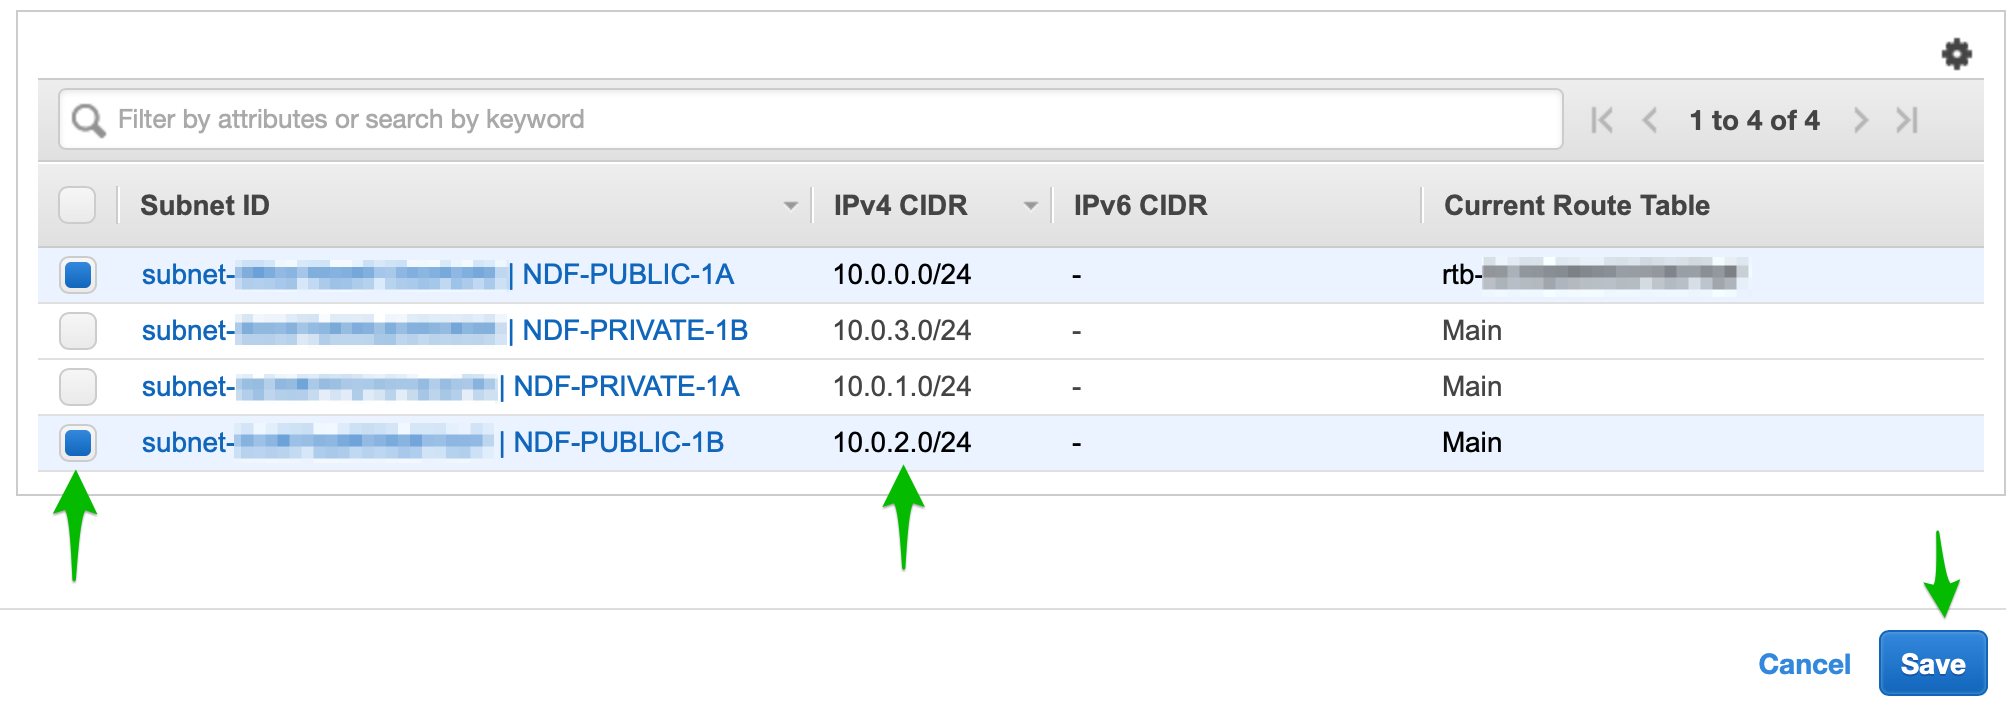
But wait. Didn't we create two public subnets? Shouldn't the 10.0.2.0/24 subnet also have access to the internet gateway? Yes! When this subnet was created, it was added to the main route which only has access within the VPC. Let's associate it with the public route table so it can reach the internet also.
- Click Edit subnet associations and add the 10.0.2.0/24 subnet.
Network Access Control Lists (ACLs)
Now that we have routing in our network set up the way we want it, the next step is to add another layer of security using ACLs. ACLs control the flow of data in and out of a subnet. You can think of ACLs as providing the same function as a traditional network firewall. ACLs allow you to set specific ports and protocols that are allowed or blocked on your network.
To take our example one step farther, let's say that we are going to run a web server (e.g. Apache) in each of our public subnets and a MySQL database server in each of the private subnets. We would use Amazon EC2 to create and deploy these instances, but this is out of scope for this tutorial. The important thing is that we know what ports and protocols are needed, and where the data flow needs to take place. In this example, end-users on the internet need to be able to reach our web servers, and the web servers need to be able to reach the database.
Putting the database server in a private subnet and protecting it with an ACL helps prevent unauthorized access to data.
We will need to create two ACLs to accomplish these controls. One ACL will be used by both public subnets to only allow traffic from the internet on port 80 (HTTP) and 443 (HTTPS). The other ACL will be used by both private subnets to allow traffic only from the public subnet to the database on port 3306 (MySQL). We will also allow outbound traffic from our subnets to the internet; this allows us to download security patches and perform other maintenance on our instances.
Limiting network traffic to only the ports needed to provide the desired functionality is good security practice.
Open the ACL panel by clicking Network ACLs from the panel on the left in the VPC dashboard (it's a little farther down under the Security sub-heading). The VPC wizard created one ACL for us. The default ACL is wide open; it does not block any traffic at all. This is not a secure configuration.
- Select the ACL created for us in the table.
You will notice there is a tab for Inbound Rules and a tab for Outbound Rules (among others). We will modify this ACL to become the one we will use for the public subnets allowing only appropriate traffic to our web servers. Click on the Inbound Rules tab. Here you will see a line that shows ALL Traffic, ALL protocols, ALL ports, a source of 0.0.0.0/0 (this CIDR means "the entire internet") and behavior set to ALLOW.
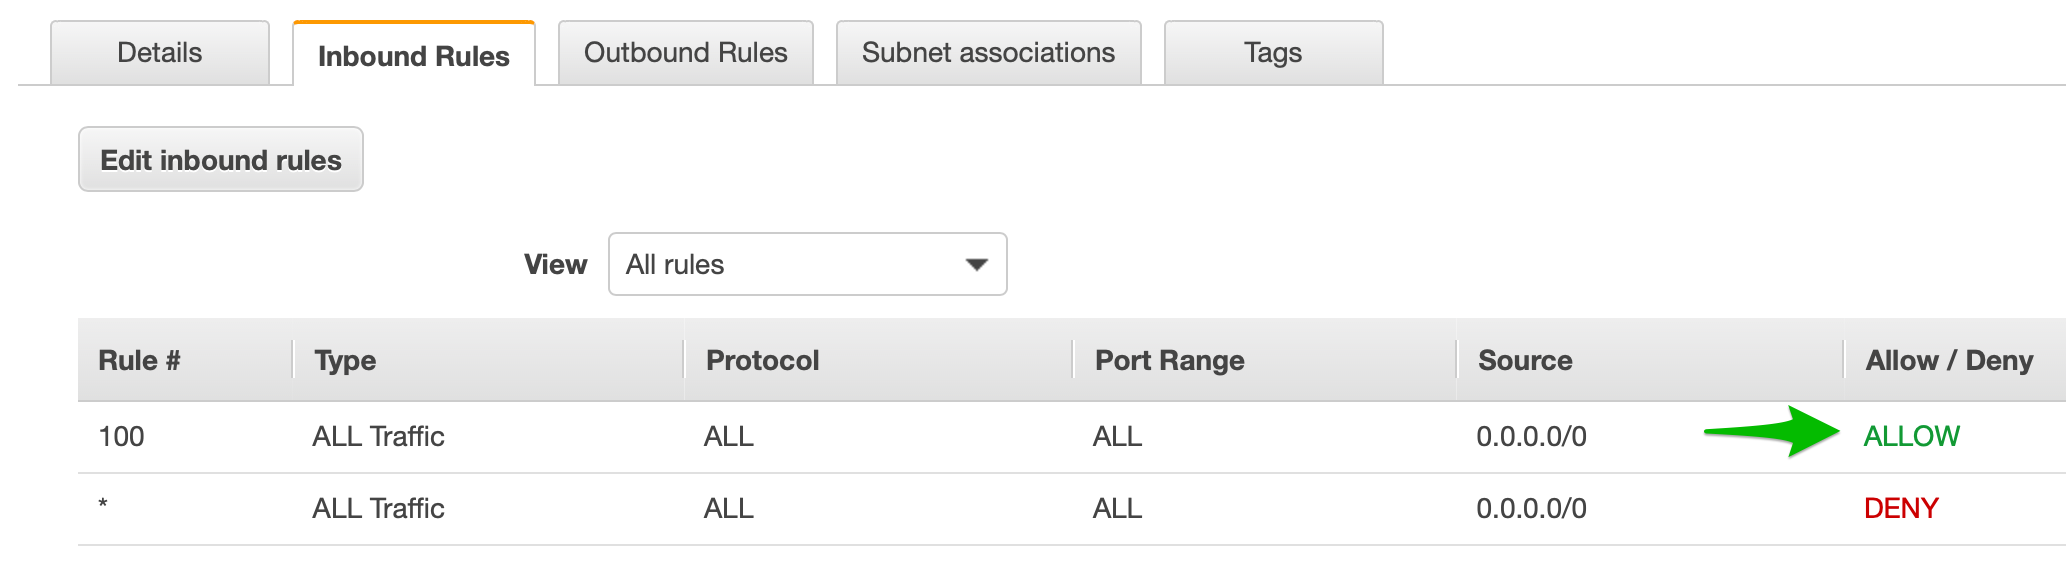
So what's the other line that shows ALL Traffic, ALL protocols, ALL ports, a source of 0.0.0.0/0, set to DENY? Doesn't that block all network access?
These two rules do seem to be in conflict with each other. A key point to understand about ACLs is that, when assessing network traffic, they process their rules in order and use the first one that matches. This means that, with this ACL as it's currently configured, ALL traffic will match the first rule and be ALLOWED. The second rule will never get triggered. It is best practice to have this DENY all rule as the last rule in every ACL; this makes it so that any traffic that you do not explicitly ALLOW, will be denied.
-
Click the Edit Inbound Rules button. Change the type in the first row to HTTP(80). Click Add Row. Set a rule number and set the type to HTTPS(443). Click Save.

-
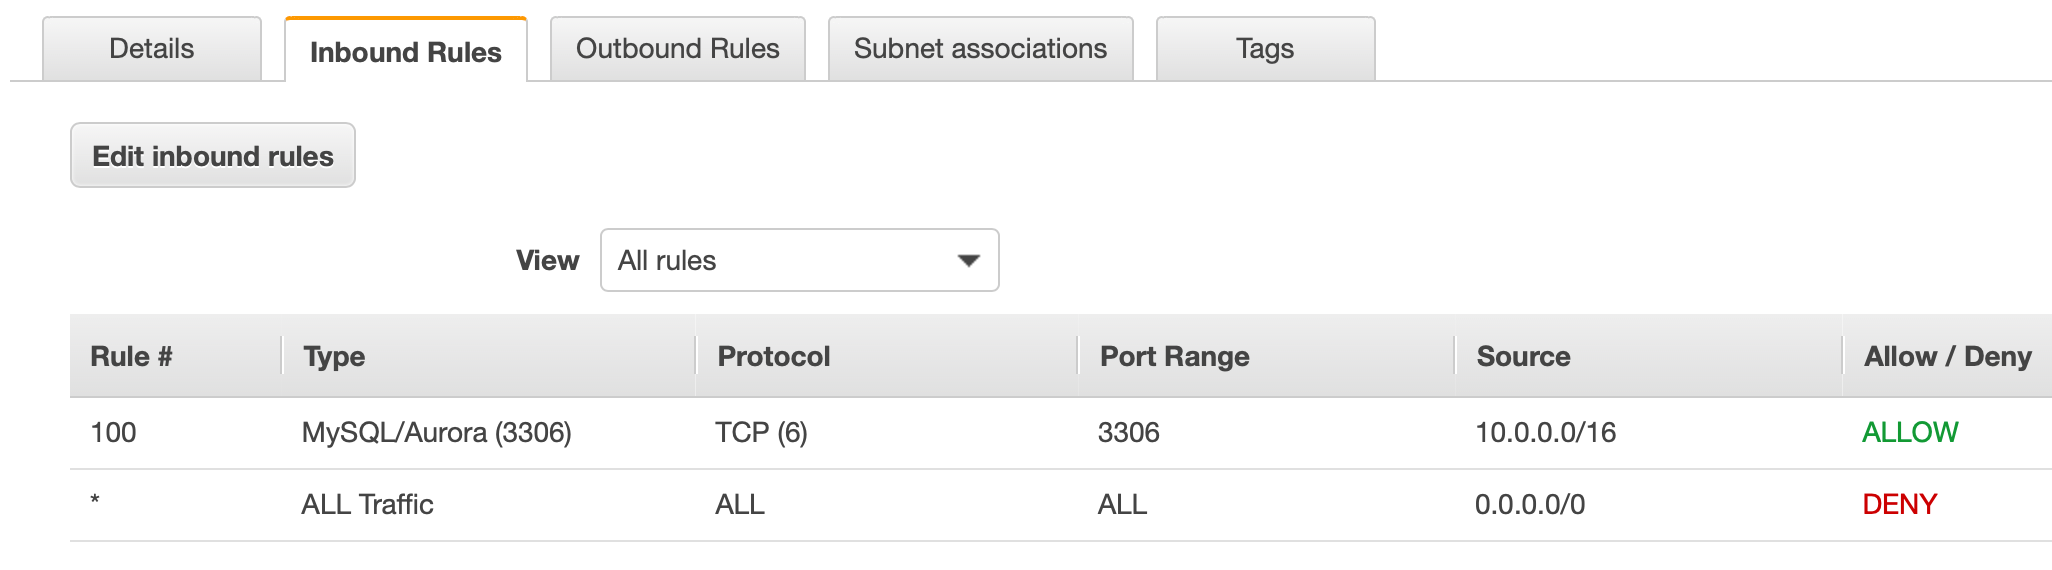
Create a new ACL for our private subnets. Click Create network ACL on the main Network ACL screen. Give it any name you want and select the correct VPC. Click the Inbound Rules tab.
Notice that the only rule that shows up by default is the DENY ALL rule. Click Edit inbound rules, then Add Rule. Give it a rule number (like 100 - this gives you the flexibility to add rules before this one in the future if you need). Set the type MySQL/Aurora (3306). For the source, we don't want the entire internet like before - we want to limit access to only our internal subnets. Input 10.0.0.0/16. This is the CIDR for our entire VPC. This is acceptable, but not as secure as it could be. To be really secure, you could limit this to only the one web server IP that you expect to be accessing the database. In that case only traffic from that specific IP address on port 3306 would be allowed. Using 10.0.0.0/16 allows access from anywhere on our private network.
Security Groups
One last security topic that is relevant to network setup is security groups. Security groups are used to control inbound and outbound traffic to EC2 instances. There can be many EC2 instances in each subnet. Since we did not actually deploy any instances in this exercise, we don't need to set one up. One was automatically created for you by the VPC wizard though. You can check it out by clicking Security Groups in the panel on the left side of the VPC Dashboard.
Defense in Depth
Some of the controls discussed in this post may seem redundant: Route tables, ACLs, and security groups all have some overlapping and redundant capabilities. This allows solution architects and system administrators to implement a security concept called Defense in Depth. This concept does implement redundant controls, such that if one is compromised (either due to a malicious actor, or by configuration error) you have other controls that still secure your system.
Conclusion
I hope you found this useful as a solutions architect or as someone who wants to pass the AWS Solutions Architect exam (associate or professional level). To pass the exam, it is not only important to read the documentation, but to actually be able to use the AWS services. Practical experience will make the difference in passing the exam as well as impressing clients and/or employers. If you would like to see more practical examples and exercises please check my profile on Medium.